
Folder & File Navigator
Display and navigate a nested folder/file hierarchy based on two grouped custom modules and load the document in a preview panel.
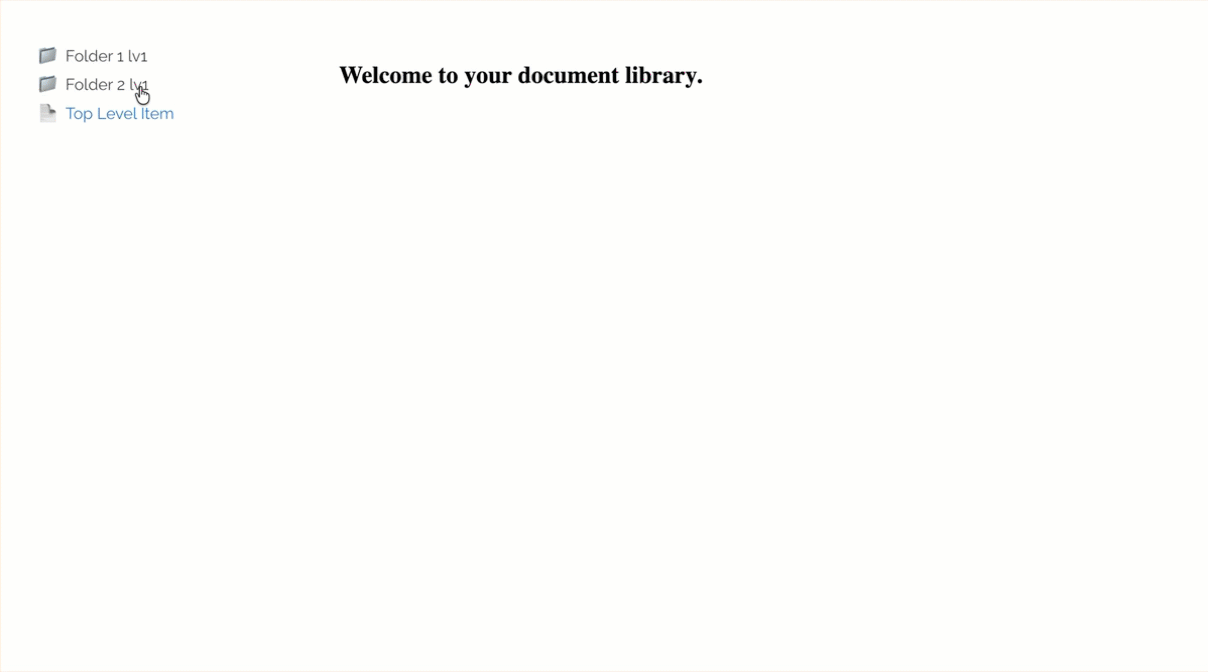
This two-panel document viewer displays a hierarchical navigation menu in the left panel, based on your nested custom module (could work for system Pages or any other parent/child modules), and loads the HTML document content into an iFrame in the right panel.
This can be used for a company document viewer or structured documentation for client access, or the hierarchy menu can be adapted for other module navigation purposes (which supports any level of nesting).
DEMO:
-
Configure your nested custom modules
We’ll use one custom module as to create the ‘folders’ (the parent module), and another custom module for the document items themselves (the child module).
Below are screenshots of how to configure the “Advanced Settings” for each module.
Set up the child module first so that you can choose this module in the parent module settings later. This will have fairly standard settings applied, and you are free to configure it as needed for your item requirements.
However, it’s recommended that you create a separate Content Template to apply by default to all child items, as these will be displayed within an iFrame and should be void of the overall site wrapper.
TIP:
In the Content Template, you could also set a toolbar for functions like ‘Print’ or ‘Save’ to provide additional functionality to the user.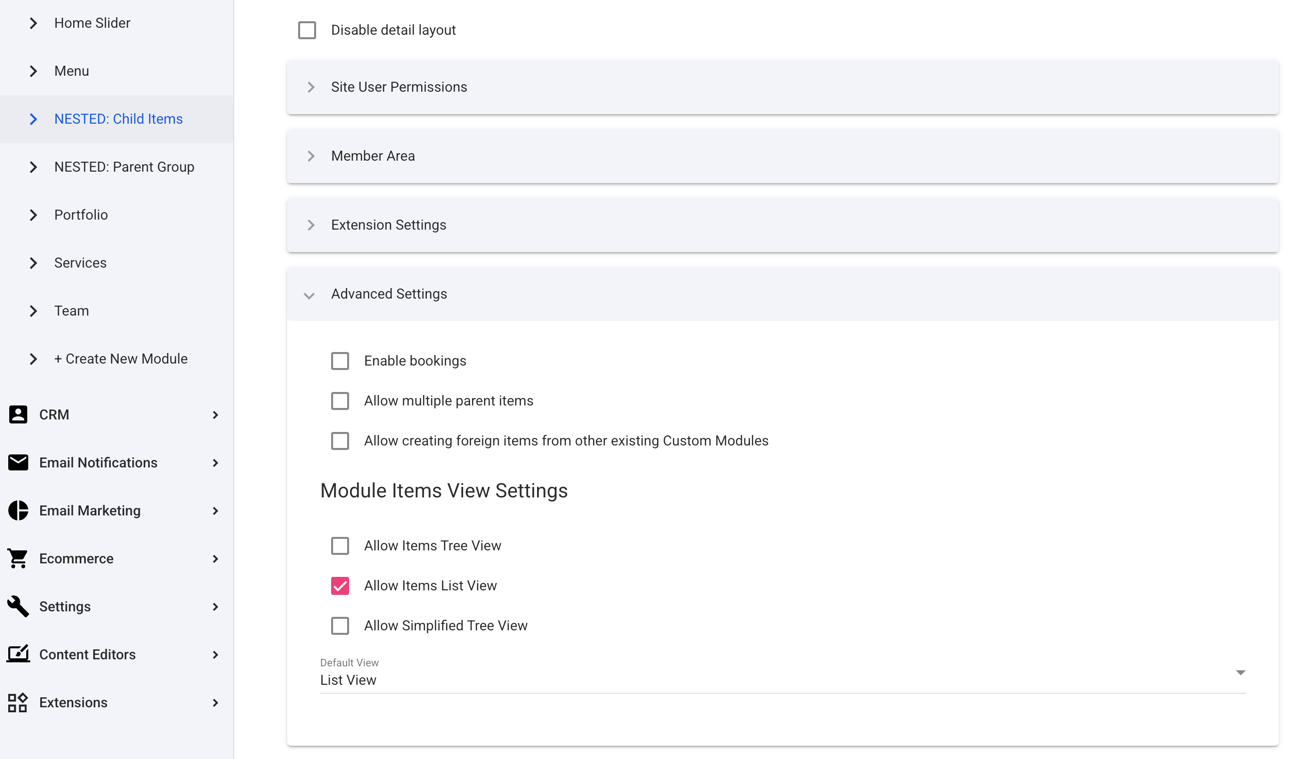
Now for the parent module. This is where the nesting settings are configured to link the two modules together and display the items in the admin for optimal usability.
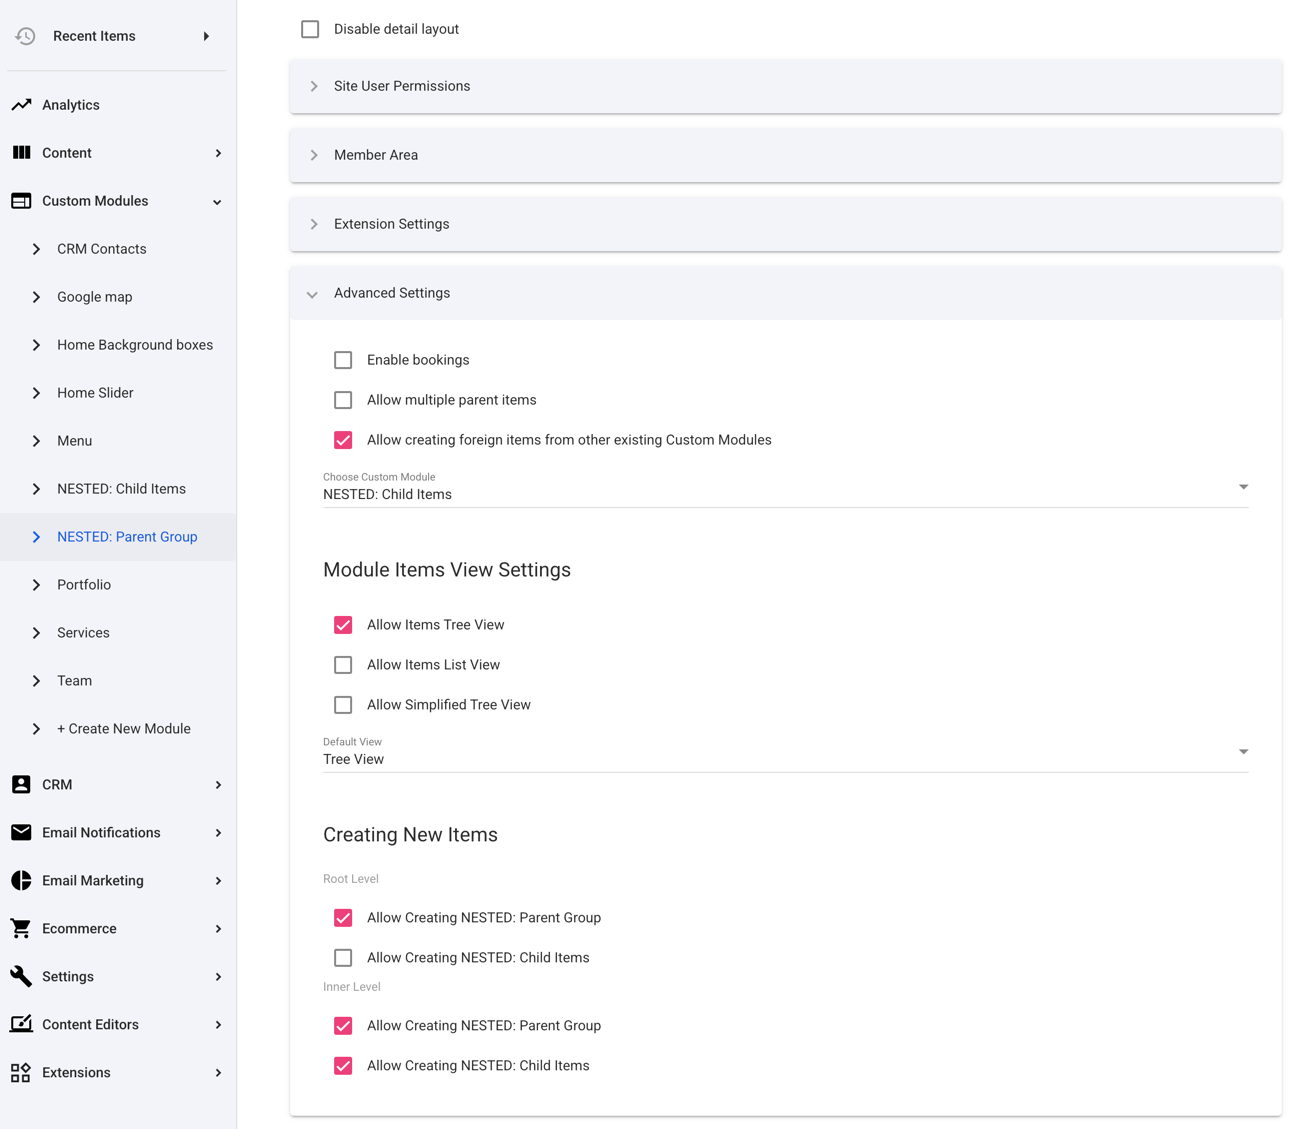
Setting the default admin listing to ‘Tree View’ and disallowing creation of child items from the root folder level is likely the most common setup here. However, if adding items at the top level (not within any folder) is required, feel free to turn this option back on.
TIP:
You could even set up “Site User Permissions” here and allow logged-in site users to create and edit documents to build a multi-user document filing system.For more information on nested custom modules, refer to the documentation here.
-
Set up the module layouts
For the child module, edit the “List” layout as follows. This simply renders a link to the item and targets the on-page iFrame we’ll set up shortly.
{% comment %}<!-- Treehouse CODE v1.0.0 -->{% endcomment %}
{% for child in this.items %}
<a class="file-item" href="{{child.url}}" target="display-frame">{{child.name}}</a>
{% endfor %}
For the child module “Detail” layout, this can be entirely up to you based on how you wish to present the content and any property values. But the default layout code would work fine to start with.
{% comment %}<!-- Treehouse CODE v1.0.0 -->{% endcomment %}
<div>
    <h2>{{this['Name']}}</h2>
    <div>
        {{this['Description']}}
    </div>
</div>
Now for the parent module “List” layout. This is where most of the logic is performed, and sets up the looping for the nested folder structure, displaying the relevant file items within each folder.
Also, a separate module output is used for any child items that exist at the root level.
Just be sure to adjust the
sourceparameters in all 3 components to match the names of your custom modules.{% comment %}<!-- Treehouse CODE v1.0.0 -->{% endcomment %} {% for folder in this.items %} <details class="folder"> <summary class="folder-item">{{folder.Name}}</summary> {% component source: "NESTED: Child Items", layout: "List", filterBy: "ParentId", filterValue: "{{folder.id}}", limit: "1000", object: "collection", itemLevel: "sub", type: "module" %} {% component source: "NESTED: Parent Group", layout: "List", filterBy: "ParentId", filterValue: "{{folder.id}}", limit: "1000", object: "collection", folderLevel: "sub", type: "module" %} </details> {% endfor %} {% if this.params.folderLevel == 'root' %} {% component source: "NESTED: Child Items", layout: "List", filterBy: "ParentId", filterValue: "-1", limit: "1000", object: "collection", itemLevel: "root", type: "module" %} {% endif %}TIP:
Currently, file items are listed first, with any subfolders listed at the bottom. If you’d prefer folders listed first, simply swap the position of each component line. -
Document Viewer Page Setup
Set up a general page for accessing the document viewer and, optionally, a page for the default document first displayed - ideal for posting instructions or a welcome message.
Replace the iFrame source URL with the path to your default page.Again, be sure to adjust the
sourceparameters in the components to match the name of your parent custom module.2-column setup using Foundation
{% comment %}<!-- Treehouse CODE v1.0.0 -->{% endcomment %}
<div class="grid-x grid-margin-x">
    <div class="cell medium-4 large-3">
        {% component source: "NESTED: Parent Group", layout: "List", filterBy: "ParentId", filterValue: "-1", limit: "1000", object: "collection", folderLevel: "root", type: "module" %}
    </div>
    <div class="cell medium-8 large-9">
        <iframe src="/nested-module-start-page" name="display-frame" width="100%" height="800px"></iframe>
    </div>
</div>
2-column setup using Bootstrap
{% comment %}<!-- Treehouse CODE v1.0.0 -->{% endcomment %} <div class="row"> <div class="col-12 col-md-4 col-lg-3"> {% component source: "NESTED: Parent Group", layout: "List", filterBy: "ParentId", filterValue: "-1", limit: "1000", object: "collection", folderLevel: "root", type: "module" %} </div> <div class="col-12 col-md-8 col-lg-9"> <iframe src="/nested-module-start-page" name="display-frame" width="100%" height="800px"></iframe> </div> </div> -
Adding Style
Thanks to the
detailandsummaryHTML elements, this setup does not require any JavaScript or CSS. However, some simple styles for the navigation menu make it much more intuitive./* Treehouse CODE v1.0.0 */ .folder .folder, .folder .file-item { margin-inline-start: 1.4rem; } .folder-item::-webkit-details-marker, .folder-item::marker { display: none; content: ""; } .folder-item { list-style: none; cursor: pointer; display: flex; align-items: center; } .folder-item::before { content: '📁'; margin-right: 8px; font-size: 1.2em; } .folder[open] > .folder-item::before { content: '📂'; } .file-item { display: flex; align-items: center; } .file-item::before { content: '📄'; margin-right: 8px; font-size: 1.2em; }EXTRA
You may want to display other file types, such as PDFs or images, and this is possible too. As long as the file type is supported for viewing in a browser, it will load into the iFrame.Simply add a media property to your child module to allow you to select or upload a file for viewing.
Then, add a conditional block in your file "List" layout to link to the media file instead of the item’s URL in the event that a file is added.
Replace "fileProperty" with the alias name of your media file property.
{% comment %}<!-- Treehouse CODE v1.0.0 -->{% endcomment %}
{% for child in this.items %}
<a class="file-item" href="{% if child.fileProperty != '' %}{{child.fileProperty}}{% else %}{{child.url}}{% endif %}" target="display-frame">{{child.name}}</a>
{% endfor %}
NOTE:
This technique uses recursive component output, which could result in degraded site performance if the number of module items (particularly parent folders) is very high. But for most typical scenarios, performance issues are not anticipated.
Comments or questions? Head over to the WebinOne forum to discuss with the community.